Build and Deploy Containers
This guide will walk you through the complete workflow of building and deploying containers with Atym. You'll set up your development environment, build your first container using a sample application, deploy it to your device, and learn how to update it—giving you hands-on experience with Atym's container development workflow.
This guide assumes that you have completed all previous steps in the Quickstart Guide.
Atym Development Workflow
Atym allows you to run tiny, OCI-compliant containers on MCU-based devices with the help of WebAssembly. Using our APIs and a development workflow that follows the familiar "build-push-run" paradigm used in Docker, you can quickly build applications that harness the many benefits of WebAssembly — without needing to be an expert in it.
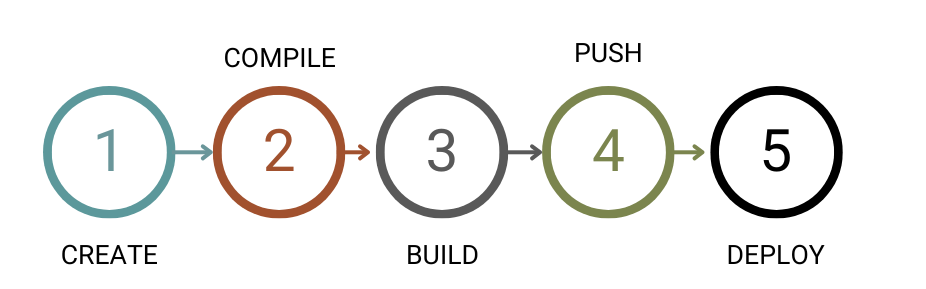
The development process for Atym containers follows these five steps:
- Create your application in standard C/C++ using Atym's APIs.
- Compile your application into an executeable module using our toolchain.
- Build an Atym container using the Atym CLI.
- Push the container to the Atym Hub, making it ready for deployment to any of your devices.
- Deploy the container to your target device.
Development Environment Setup
The Atym toolchain for C/C++ is provided as a Docker container image (via a dev container) to ensure a consistent development environment for building containerized applications with Atym.
This guide assumes you'll be using the provided dev container for development. If you prefer to set up your own environment instead, refer to the Custom Development Environment Setup page in the references section of the sidebar.
VS Code Dev Containers
A Development Container (or dev container) is a Docker container that provides a complete development environment. With a dev container, the VS Code editor operates on your local machine while the Atym toolchain runs inside the container, ensuring a consistent and isolated development environment.
Prerequisites
Before you continue, ensure the following conditions have been met:
- Download and install Docker Desktop
- Download and install Visual Studio Code
- Install the Dev Containers extension for VS Code
Setup Steps
Follow these steps to get your development environment set up using Dev Containers in VS Code:
- Clone the
Atym Toolchainrepository:
git clone --recursive https://github.com/atym-io/atym-toolchain.git
Important: Be sure to use the --recursive flag when cloning the repository. The Atym SDK and other tools are included as git submodules, and some samples require these submodules and their code to function correctly.
-
Open the
atym-toolchainfolder with VS Code and you should see a dialog box from the Dev Containers extension in the bottom right corner, asking if you want to reopen the folder in a container. Click "Reopen in Container." -
Wait for 15-20 seconds while the container is being prepared.
If you don't see the dialog box mentioned in step 2, you can manually reopen the folder in a container:
- Open the Command Palette in VS Code by pressing
Ctrl+Shift+P(orCmd+Shift+Pon macOS) - Type "Dev Containers: Reopen in Container" and select it
- VS Code will then build and open the development container
Verify the Setup
After completing the setup, verify your environment is working correctly by typing cat /opt/wasi-sdk/VERSION at the terminal.
If you see output like below, your setup is complete and working correctly:
25.0
wasi-libc: 574b88da4815
llvm: ab4b5a2db582
llvm-version: 19.1.5
config: f992bcc08219
Build Your First Container
Now that you've set up your Atym development environment, we're going to build our first Atym container. Building Atym containers is a straightforward process thanks to the provided Atym C/C++ toolchain container image. In essentially three steps you can turn your code into an Atym container.
Make sure to run all the commands below inside your dev container in VS Code. The dev container provides all the necessary tools (cmake, make, atym CLI, etc.) pre-configured and ready to use.
For this demo, we'll be using the hello-world sample application from the Atym Toolchain repository.
Step 1: Navigate to the Sample
Navigate to the hello-world sample in the Atym SDK samples directory:
cd ocre-sdk/generic/hello-world/
Step 2: Compile the Application
Create a build directory and compile the application:
mkdir build && cd build
cmake ..
make
Step 3: Build the Container
Return to the project root directory and build the Atym container:
cd ..
atymctl build
If everything went well, you've just built your first Atym container!
Deploy Your Container
After building your container, deployment to your device is a simple two-step process using the Atym CLI.
By default, Atym containers run in interpreted mode, where the WebAssembly binary is executed at runtime by the Atym runtime's interpreter. This is the simplest way to get started and works across all supported devices without any additional configuration.
For production use cases or performance-sensitive applications, Atym also supports Ahead-of-Time (AOT) compilation, which pre-compiles the WebAssembly binary into native machine code for a specific device architecture. This delivers near-native execution speeds. See the AOT Compilation reference for details on how to enable it.
Step 1: Push the Container to the Atym Hub
First, push your container to the Atym Hub:
atymctl push hello-world
Step 2: Deploy the Container to Your Device
Next, deploy the container to your device by running the following command, where the first hello-world is the container name on your device, and the second is the name in the hub:
atymctl run hello-world hello-world -n deviceName
Your deviceName can be found by running atymctl device list, and then copying the appropriate deviceName for your device.
Step 3: Verify Successful Deployment
The Atym Hub will deploy your container to the device, and you should see the following success message in your console:
atym:~$ Client connected.
     _      _________  ___   ______________  ______  ____  __
    | | /| / / __/ _ )/ _ | / __/ __/ __/  |/  / _ )/ /\ \/ /
    | |/ |/ / _// _  / __ |_\ \_\ \/ _// /|_/ / _  / /__\  /
    |__/|__/___/____/_/ |_/___/___/___/_/  /_/____/____//_/
                                           powered by Atym

    Update v4
Update Your Container
This section demonstrates how to update and redeploy an Atym container, a fundamental part of container-based development. In container-based development, updates follow a consistent workflow of modifying code, rebuilding with a new version tag, and deploying to your device.
Step 1: Update the Application Code
Update the version found in the application code (main.c) from v4 to v5:
Change:
printf("\n\n Update v4\n")
To:
printf("\n\n Update v5\n")
Step 2: Re-compile the Application
Re-compile your application:
cd build
cmake ..
make
Step 3: Re-build the Container
Re-build the Atym container with your newly updated code:
cd ..
atymctl build
Step 4: Push to Atym Hub
Push your updated container to the Atym Hub with the version tag v5:
atymctl push hello-world:v5
Step 5: Verify Container Upload
Verify your new container version is available in the Atym Hub:
atymctl image list hello-world
You should see the following output:
[
    "v5",
    "latest"
]
Step 6: Deploy the Update
Finally, deploy the updated container to your device:
atymctl run hello-world hello-world:v5 -n deviceName
Notice that this time we're specifying the version tag :v5 when deploying. Previously, when we didn't specify a tag, Atym automatically pulled the latest version. By specifying a tag, we can deploy specific versions of our container.
Step 7: Verify Successful Deployment
If all goes well, you should see the following output in your terminal after a few moments (this may take 10-15 seconds). Note the new version at the bottom, "Update v5".
atym:~$ Client connected.
     _      _________  ___   ______________  ______  ____  __
    | | /| / / __/ _ )/ _ | / __/ __/ __/  |/  / _ )/ /\ \/ /
    | |/ |/ / _// _  / __ |_\ \_\ \/ _// /|_/ / _  / /__\  /
    |__/|__/___/____/_/ |_/___/___/___/_/  /_/____/____//_/
                                           powered by Atym

    Update v5
Next Steps
Congratulations! You've successfully built, deployed, and updated your first Atym container. You now understand the core container development workflow with Atym.
Here are some recommended next steps:
- Explore additional Sample Applications from the
atym-toolchainrepository to get familiar with different use cases and patterns - For a deeper understanding of container development workflows and Atym's APIs, continue to the Developer Guide
- To understand how Atym works at a high level, check out the Overview to learn about the system design and how all the components fit together